Extended Top Hats Installation Instructions

Welcome to our extended top hat instructions guide. This overview is designed to make the installation process clear and straightforward, covering recommended tools, factory torque specs, and key tips to ensure proper fitment and performance. While this guide uses a Honda Civic EF as the reference vehicle, these extended top hats are also compatible with the following platforms when used with appropriate coilover setups:
Honda Civic EF (1988–1991)
Honda Civic EG (1992–1995)
Honda Civic EK (1996–2000)
Honda S2000 (1999–2009)
Acura Integra DA (1990–1993)
Acura Integra DC (1994–2001)
Once installation is complete, we strongly recommend scheduling a professional alignment to ensure correct suspension geometry, predictable handling, and even tire wear.
Function and Form extended top hats are engineered to restore full shock stroke on vehicles running shorter springs or lowered ride heights. By raising the spring perch, they allow the damper to operate within its optimal range while maintaining proper preload. This helps reduce bottoming out, improves overall ride quality, and extends the service life of suspension components—especially on lowered vehicles where usable travel is often compromised.
Extended top hats are ideal for daily drivers, performance street builds, and track-focused cars where maintaining suspension travel is critical. By preserving full damper function and proper preload, they improve comfort, stability, and feedback while keeping the suspension responsive under aggressive driving conditions. Whether the goal is to protect your investment in a high-quality coilover system or fine-tune suspension geometry for better handling, extended top hats are an essential upgrade.

TOOLS NEEDED
Sockets: 19mm, 17mm, 14mm, 12mm.
Wrenches: 17mm.
Impact wrench.
Ratchet.
Torque wrench.
Spanner wrenches.
Measuring tape (provided with kit).
Floor jack.
Jack stands.
Flashlight (optional).
Safely lift the vehicle using the designated jack points.
Remove the wheels using a 19mm socket.

Remove the brake line bracket bolt using a 12 mm socket.
Remove the lower mount bolt from the strut fork pinch clamp using a 17 mm socket.
Remove the lower strut fork mounting bolt using a 17 mm socket and 17 mm wrench, then remove the strut fork.
Remove the three top hat nuts using a 14 mm socket, then remove the strut assembly.

Remove the top hat by loosening and removing the top hat retaining nut, then remove the top hat.
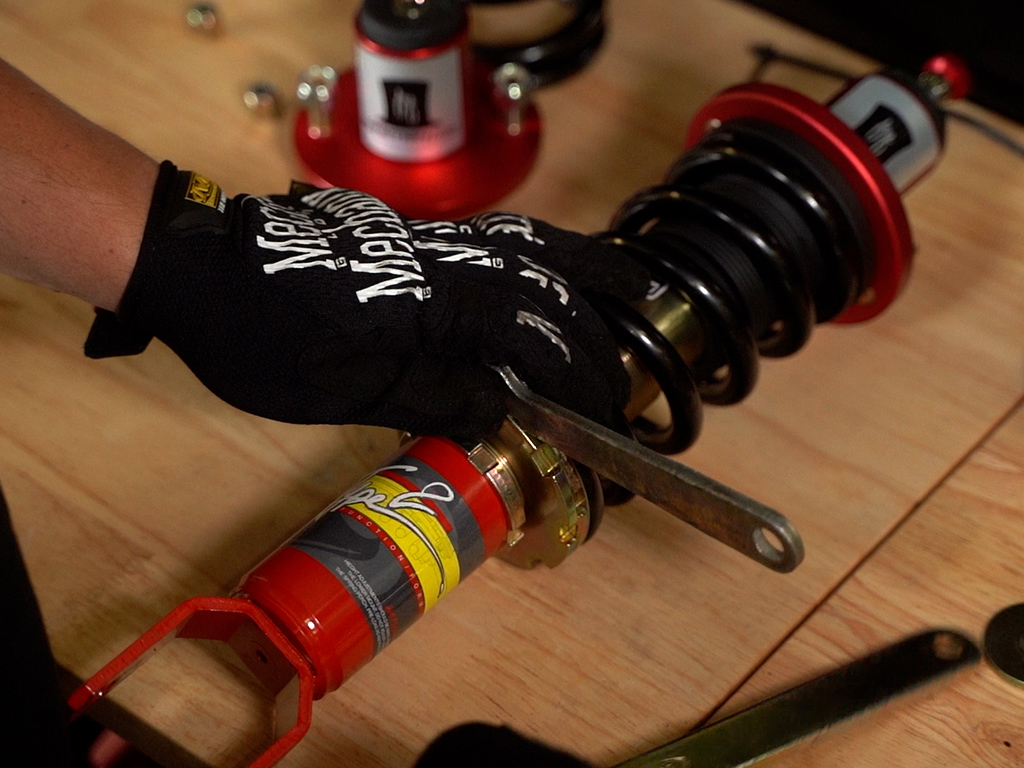
Install the extended top hat using the included 6-inch springs. Set preload by compressing the spring 7 mm.
Click here for video on how to reset preload.
Place the strut into position and hand tighten the top hat nuts.

Install the fork and torque the pinch bolt to 32 lb-ft.
Torque the lower mount bolt/nut with a 17mm socket and 17mm wrench to 47 lb-ft.
Install the brake line bracket with a 12mm socket to 16 lb-ft.
Torque top hat nuts with a 14mm socket to 33 lb-ft
Reinstall the wheels and torque the lug nuts to 80 lb-ft.
This completes the extended top hat installation instructions.

Learn about us here
Follow us on Instagram